How to create an STM32 project for register-level programming?
For a very long time, readers and course participants have been asking me: “MATI! When will you finally do something on STM32, but at the register level?”. I usually replied: “when the time comes”, but I didn’t know myself when that would happen.
Until now 😎 We’re officially starting a series of posts dedicated to programming STM32 at the register level 🥳
It will be a dozen or so posts covering the basics. Perfect as a starting point for anyone who wants to begin their STM32 journey without HAL and without Arduino.
STM32 Register-Level Series on YouTube
These posts are created in parallel with a series on my YouTube channel on the same topic. If you prefer the video version, I invite you there. These articles are a summary of what I show on YouTube.
STM32 NUCLEO-C031C6 Platform
We will be programming hardware, so naturally we need to have it. For this series I chose an STM32 from the C0 family. It was released at the beginning of 2023. It was created with the idea of being a simple replacement for 8-bit microcontrollers.
It is very minimalist and “poor” in peripherals, as befits an STM32. At the same time, these chips are uncomplicated, which will make it easier for us to read the documentation and take the first steps.
I chose specifically the STM32C031C6T6. Why? Because we have a dedicated board NUCLEO-C031C6 for it, which you can buy, among other places, in my store.
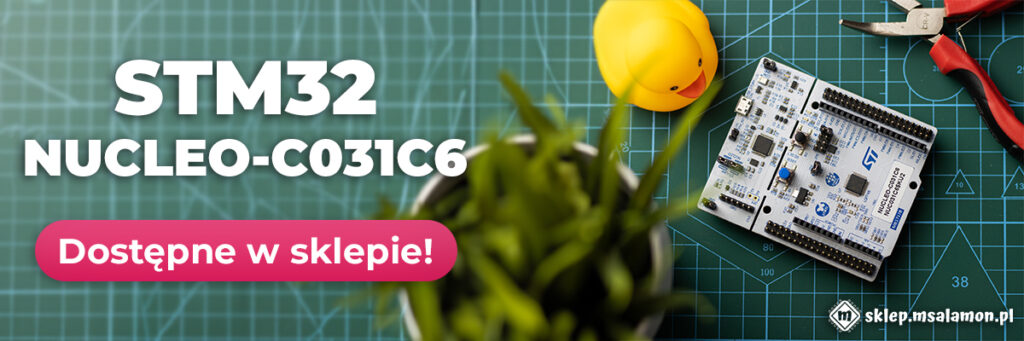
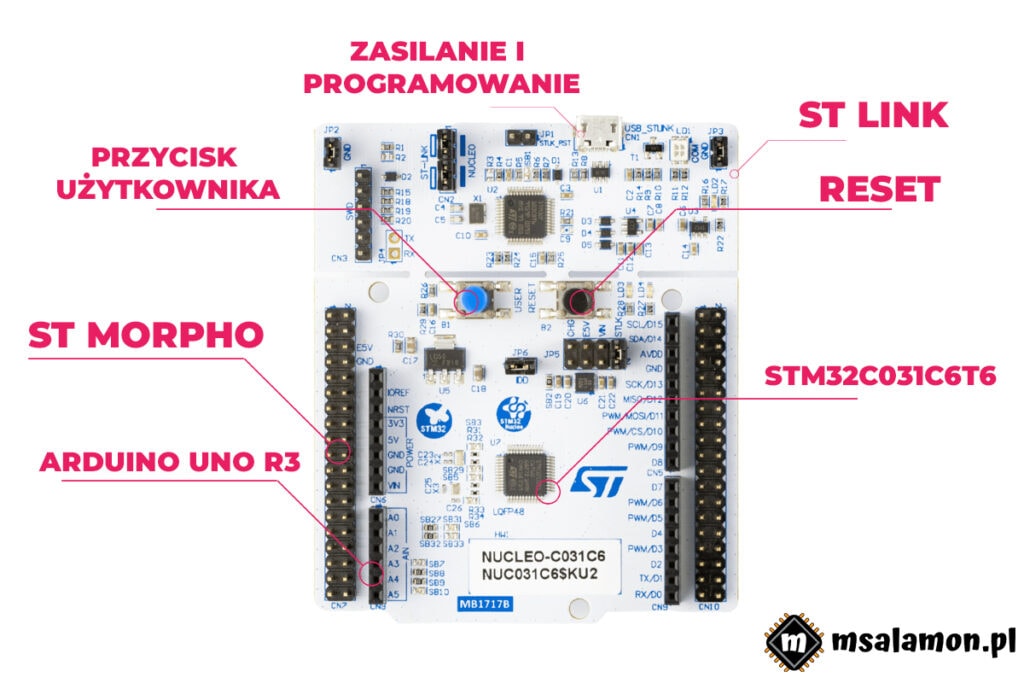
It’s a ready-made platform with a microcontroller that is ready to work right away. What about the programmer? Exactly. Nucleo kits are known for having a built-in ST-Link programmer and debugger. That’s the case here as well. It’s properly connected and ready to go. Just plug in a USB cable (micro, in our case) and the board is ready to run.
Besides the programmer, we will also find connectors here. We have two types of connectors:
- Compatible with Arduino Uno Rev 3. A standard in today’s world. Shields designed for Arduino fit here.
- ST Morpho. Two large connectors that expose all microcontroller pins on the Nucleo.
We also have two buttons available: a user button connected to one of the pins, and a microcontroller Reset.
Near the buttons there is always at least one LED that is also available for our use. On our Nucleo it is labeled as LD4.
Required documentation
Programming STM32 or other microcontrollers relies on heavy work with documentation. We will need a few documents that you can download from your microcontroller’s page. For our STM32C031C6T6, it will be here: https://www.st.com/en/microcontrollers-microprocessors/stm32c031c6.html
Datasheet – abbreviated DS
The datasheet for a specific microcontroller and its general description. Here you will find a general functional description of the entire chip: what peripherals it contains and what they do (roughly). A very interesting part is the block diagram, which we will use more than once in this series. From it we learn about the internal connections between individual peripherals of the microcontroller.
In the datasheet you will find the pinout, i.e., which signals are routed to which package pins. Often these documents cover several packages. Right after the pinout you will find a list of all alternate functions for a given pin. Here you’ll learn what additional functions a pin can perform. You’ll also learn whether a given pin is 5V-tolerant. STM32 chips typically run at 3.3V, but most of their pins are 5V-tolerant.
The next category of information in the datasheet is the electrical characteristics. Here you will find all information about power supply, maximum currents, as well as a diagram of correct microcontroller powering. Useful when building your own device.
At the very end there is information about packages and their dimensions. If you ever want to design a PCB for a microcontroller, you will certainly use this… or you’ll find a ready-made component library.
Reference Manual – abbreviated RM
The largest of the required documents and basically essential for register-level programming. We’ll be abusing it throughout this entire series. What will we find inside?
A detailed description of every element of the microcontroller. All peripherals, memories, clocking, and power systems are described in detail here. Except for the core. It has separate documentation, but we won’t need it in this series.
You will find a functional description, i.e., how peripherals work and what functions and modes they have. Besides the detailed description, there is also a precise description of registers and their contents.
This is where we will take most of the information on how to configure a specific peripheral and how to use it. Programming microcontrollers is hard grinding through documentation. It’s often confusing for beginners, but it doesn’t take long to get the hang of it.
I won’t discuss what chapters we have here. We’ll discover them gradually as needed.
Errata – abbreviated ES
Some say it’s more important than the others. Why? This is where you will find known and publicly disclosed silicon bugs in the microcontroller. Sometimes you do everything according to the Reference Manual and it still doesn’t work. The solution may be in the Errata.
This is where the manufacturer states what doesn’t work and how to deal with it. These are so-called Workarounds, i.e., ways around problems—either hardware or software, depending on what’s broken.
I saw an interesting thesis based on an errata document. It said more or less that you can tell from it whether the manufacturer cares about hardware makers using their chips. Because if across several subsequent microcontroller series the exact same bug appears, what does that say? Some people say it shows a lack of respect 🙂
I have a slightly different opinion on that. Sometimes it’s simply economically not worth it 🙂
Nucleo documentation
In this series we will work on the evaluation board NUCLEO-C031C6. It’s also worth getting useful documentation for it. I would highlight 3 useful documents. They can be downloaded from your Nucleo board’s page. Our board: https://www.st.com/en/evaluation-tools/nucleo-c031c6.html
- Data Brief / Specification
A short document with the Nucleo board specifications. It covers the whole similar series. From it we’ll learn what, besides the microcontroller, is present on our Nucleo. If you wanted to use the same microcontroller on your own PCB, you’ll find its exact model here.
- User Manual
A description of the elements and configuration of the Nucleo board. Development kits can be hardware-configured. This is enabled by various jumpers. We have large jumpers that we can change manually. We also have small jumpers in the form of SMD resistors that will need to be re-soldered.
This document describes, among other things, the configuration options of our Nucleo board. You will also find the pinout and a list of functions that you can route to the Nucleo connectors.
Here you will also learn about the built-in ST-Link and how to use it to program external chips. It is not limited to working only with the Nucleo. You can successfully use it “externally”.
- Schematic
The last document will be the Nucleo schematic. ST is kind enough to provide PDF schematics for all of their eval boards. Here we will take a look to check how the button is connected to the microcontroller.
You can read quite a lot from the schematic. Sometimes it happens that some pins are connected together for some reason. Here you’ll learn what those connections are.
You can also use the schematic if you want to design your own PCB.
You will find the schematic in the CAD tab.
Creating a project in STM32CubeIDE
To program STM32 we need something to do it in. For this series I chose none other than STM32CubeIDE. Download here: https://www.st.com/en/development-tools/stm32cubeide.html
I’m using version 1.12.1, but for register-level programming it doesn’t matter much. Well… CubeIDE for register-level programming? Why? I’ll show you how to use this environment cleverly to make your life easier.
So what do we have to do now to write code? Let’s go step by step:
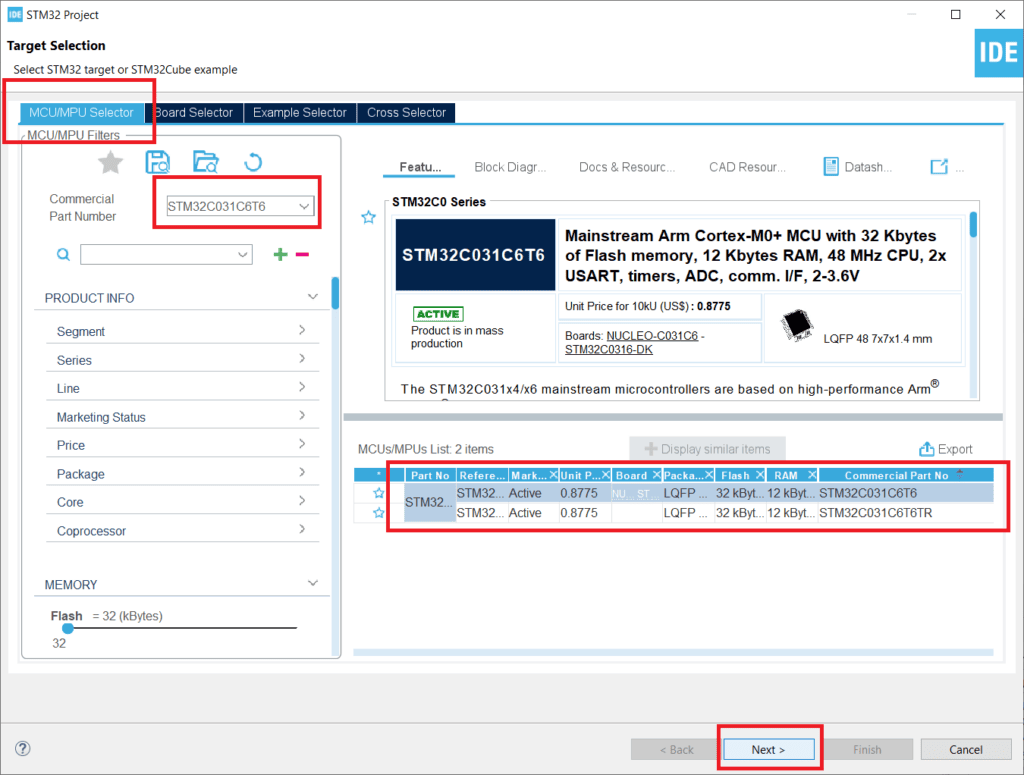
Create an empty project. We need to create a new, clean project. First, the MCU Selector will open. Use the MCU/MPU Selector tab and enter the microcontroller model. Ours is STM32C031C6T6.
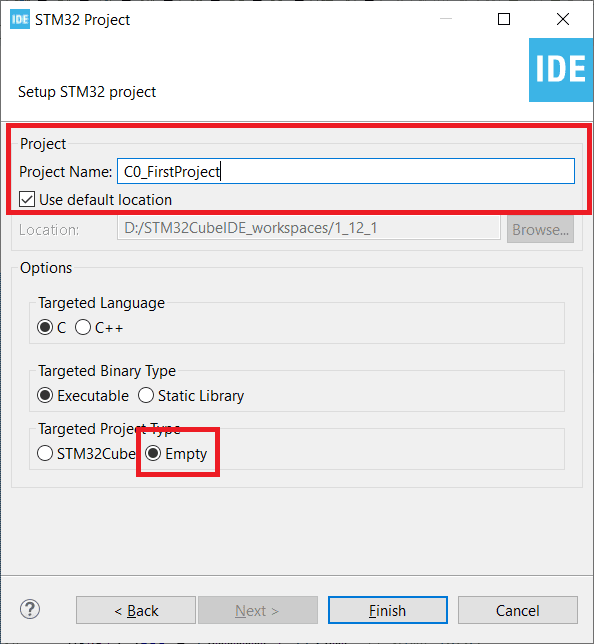
In the configurator you have to be careful not to select the option to generate a project based on HAL. Select Empty Project here. Name the project however you want and click Finish.
We have a project. Unfortunately, we still can’t write anything in it yet. We need to add CMSIS libraries and microcontroller headers. We have two options to choose from. Either we search the Internet… or we extract them from a HAL-based project. That’s exactly, among other things, why we need CubeIDE 🙂
Create a second project in the same way, but at the end selecting STM32Cube instead of Empty. This will be our donor project.
To add the microcontroller headers we need to copy a few folders:
- /Drivers/CMSIS/Device/ST/STM32C0xx
- /Drivers/CMSIS/Include
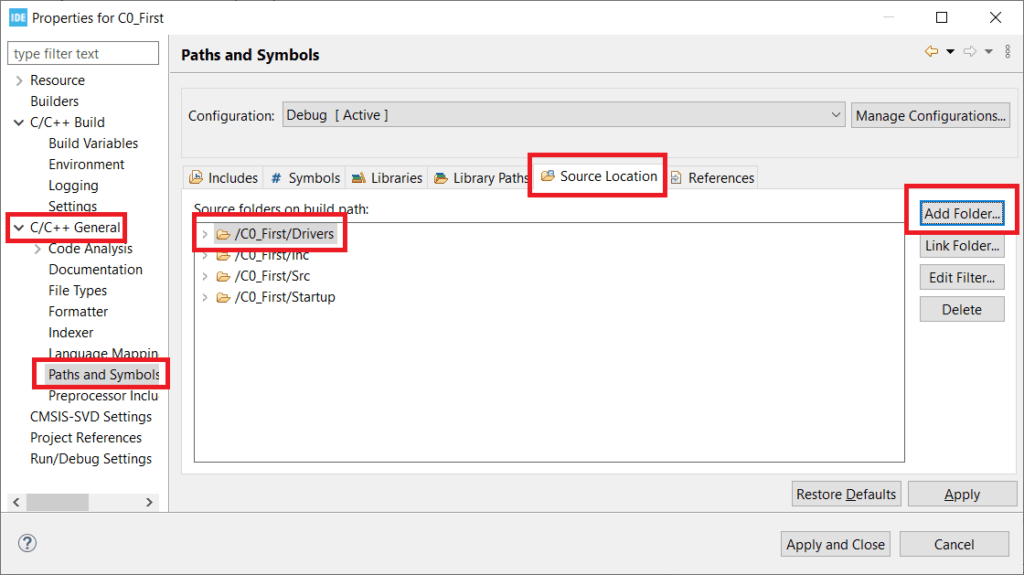
We created a new folder – Drivers. It is not added to compilation by default. We must add it to the compiler’s list. Right-click (RMB) on the project and go to Properties. Then find the configuration C/C++ General > Paths and Symbols > Source Location and add the Drivers folder using Add Folder.
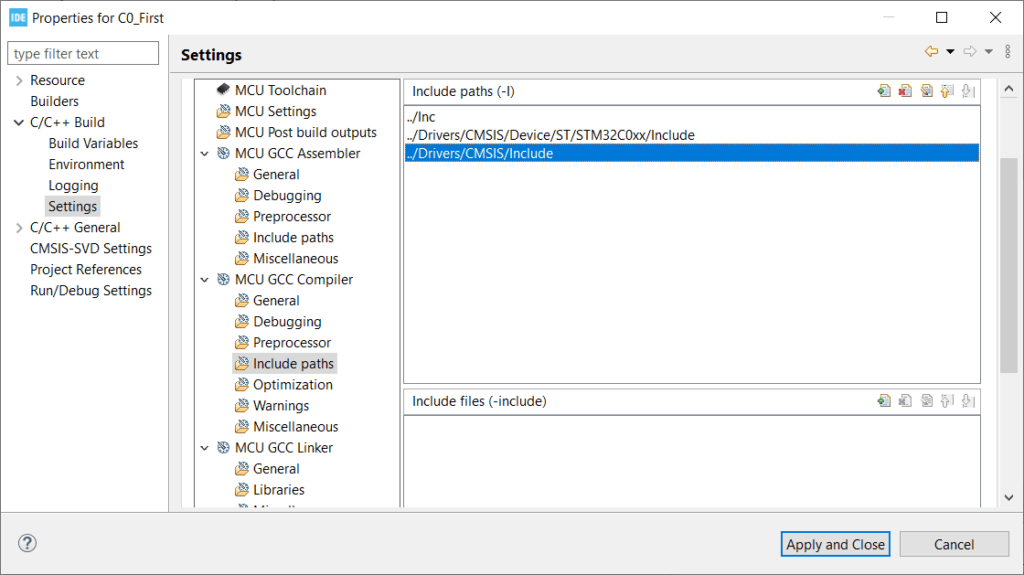
Now let’s add Include paths for Device and CMSIS in the project’s Include paths. It will be much easier to include them. Instead of writing the whole path, we’ll simply type the filename.
We stay in the project Properties. This time go to C/C++ Build > Settings > MCU GCC Compiler > Include paths and add two entries pointing to our headers.
- ../Drivers/CMSIS/Device/ST/STM32C0xx/Include
- ../Drivers/CMSIS/Include
Now we can write code 🥳 but… we still don’t know what and how. Where will we learn it from? Of course from me, but that’s in the next post.
Summary
As you can see, there are quite a few “introductory” elements. However, it’s not that scary, and with the help of STM32CubeIDE it goes quite smoothly.
In the next post we’ll deal with GPIO Output. We’ll make the microcontroller Hello World, i.e., blinking an LED 😎
Let me know in the comments if you liked this post! Maybe you have a suggestion for what to show as part of the STM32 Register-Level series? Share this article with your friends.
I also invite you to my store, where you can buy interesting electronics for programming, such as NUCLEO-C031C6, which we use in this series: https://sklep.msalamon.pl
The project from this article can be found at: https://github.com/lamik/stm32narejestrach_1
Podobne artykuły





0 Comments