Doing graphics on microcontrollers is always a huge challenge. Even more so if it’s supposed to look nice. For years we’ve known simple so‑called GFX libraries that let us draw bitmaps or various fonts. However, that’s not enough, because often our GUI still looks like it came from 1990s devices, or even worse. TouchGFX comes to the rescue!
TouchGFX on STM32
What is this mysterious TouchGFX? According to the manufacturer, it’s an advanced software graphics framework optimized for STM32. That wording sounds a bit complicated. What does it mean in simple terms?
I would say that TouchGFX is essentially a graphics engine for microcontrollers. It uses STM32 microcontroller resources such as the Chrom-ART™ accelerator to efficiently manage what happens on the display.
TouchGFX includes TouchGFX Designer. It is WYSIWYG software (hard word, huh?) that allows us to design the entire graphical look of our application.
Not only the look, but also animations, transitions between screens, and behavior when touching the touchscreen panel or pressing defined buttons.
In this Designer we create the entire GUI, which in terms of appearance is no different from modern creations. It’s said that TouchGFX lets us generate smartphone-like GUIs. Just see for yourself.
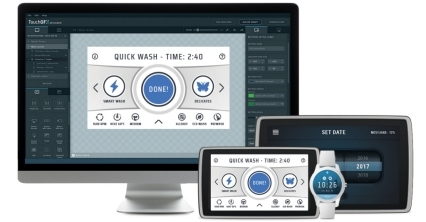
It looks pretty nice, doesn’t it? Wait until you see how it works 🙂
I’ll write about how the whole TouchGFX works in the next articles. Today I’ll focus on running it for the first time.
Demo platform
ST Microelectronics being ST Microelectronics — they provide ready-made and easy (we’ll see about that) demo programs to run. The same is true for TouchGFX.
You can run the demos, for example, on STM32 Discovery kits with a display. However, today I’ll use another option. Recently ST released a dedicated TouchGFX shield for Nucleo-64 boards.
This shield is meant to show that TouchGFX can also be used on smaller microcontrollers that don’t have many resources like e.g. RAM.
RAM is very much needed with displays. It’s where all graphics are drawn using buffering. If we don’t have enough RAM, then what?
TouchGFX supports partial buffering and that’s exactly what the demo uses for the NUCLEO-G071RB combined with the X-NUCLEO-GFX01M1 shield.
You can buy a ready-made set in my store. It’s cheaper as a bundle.
Let’s run the demo program
So let’s move on to waking TouchGFX up for the first time. It would be nice to see it come alive.
ST has prepared easy-to-run (well… let’s say) example projects here. However, we need the TouchGFX Designer program.
Starting from version 4.16.0, this program no longer exists as a separate entity. It was pulled into the Cube extension X-CUBE-TOUCHGFX. It’s like a plugin for Cube that makes it easier to integrate a TouchGFX project with a Cube project.
You can download and unpack it, or you can install it using Cube itself. I recommend installing it from within Cube, because you’ll need it there anyway. However, you need to know where on your computer you have the repository of libraries for Cube.
After installing it, you’ll need to find the TouchGFX Designer installer in it under the path (Windows) <Repository>\Packs\STMicroelectronics\X-CUBE-TOUCHGFX\<version>\Utilities\PC_Software\TouchGFXDesigner
A terribly complicated path! As if they couldn’t keep providing the installer separately.
There is an installer there, so install the program and we move on. Launch the installed TouchGFX Designer. You’ll get a welcome window like this.
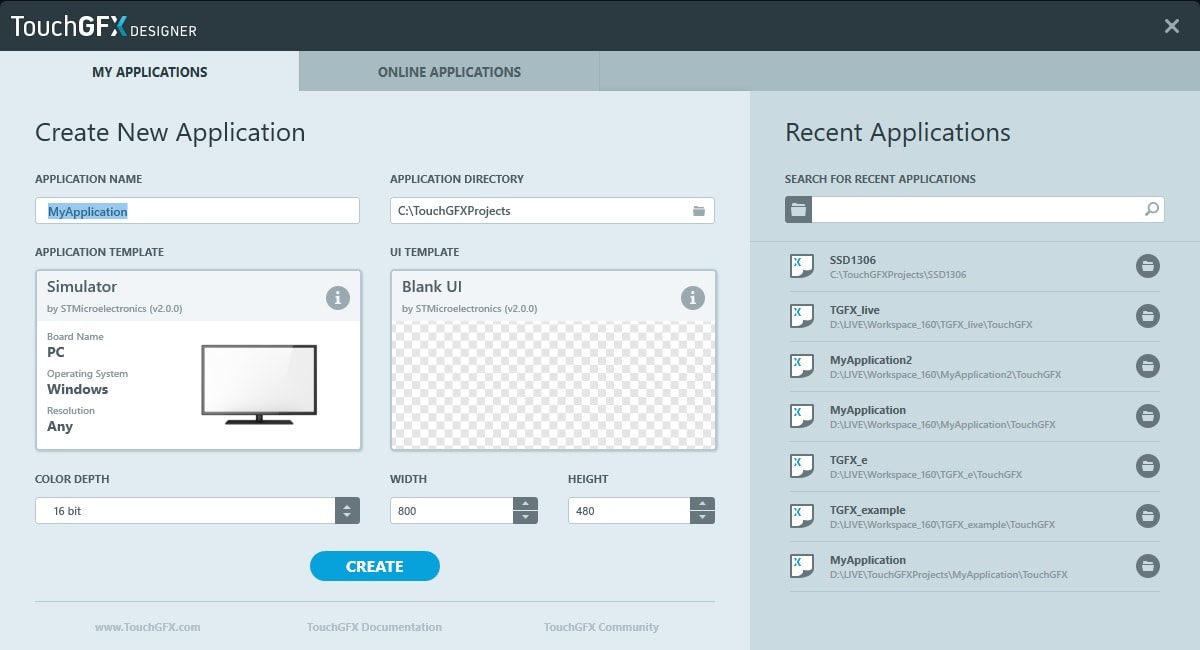
This is the screen for creating a new project. You choose an application template (the hardware it is to run on), and a UI template, i.e. the look. This time we won’t use that. At the top you have a tab like Online Applications. That’s where the demo programs for ST eval boards are, downloaded from the Internet. We go there.
Now you only have Online Application to choose from. Enter it and find the appropriate demo. In the case of NUCLEO-G071RB with the X-NUCLEO-GFX01M1 shield it will look like below.

Click Select. You still need to provide the application name and the path for the project. Here you have freedom 🙂 I wouldn’t recommend Polish characters, though, because they are not handled well by CubeIDE and the compiler.
Once you have everything, click Create.

At this moment our demo application is being pulled from the ST repository. After that you’ll see the Designer screen.

What you’re looking at is something we’ll deal with another time. There are tons of features here that, even on the day I’m writing this article, I have no idea about.
You can look around this program. You’ll find, for example, all the images that the demo GUI uses as well as the texts. The main “workhorse” is the first screen called Canvas, though.
It’s exactly where you design the entire look of your application. We’ll get to know it intensively. I can’t wait myself 😉
Alright, but our goal is simply to run the example. On the top right you have 3 buttons.
- Run Simulator — runs the simulator of your TouchGFX project. You can test the GUI without flashing it to the microcontroller. Great stuff. In our case there is one problem. We use a joystick on the Shield for navigation, so we have no way to move around in the simulator. It will work great in applications with a touchscreen panel.
- Run Target — I haven’t managed to run this yet. It should work so that we run the project directly from TouchGFX Designer on our evaluation kit.
- Generate Code — this is what we’re interested in right now. TouchGFX should generate a complete project for CubeIDE, which can then be imported.
So I try to generate. A blue bar should appear at the bottom of the window, indicating code generation. When it finishes — you can open STM32CubeIDE. Only which one? Unfortunately it’s hard to find a document that says which CubeIDE is appropriate for projects from a given TouchGFX Designer version.
But, but, but! This applies if you install those two tools separately. If you installed TouchGFX Designer by pulling the add-on in CubeIDE, it should all work together.
I have the STM32Cube IDE 1.6.0 + TouchGFX Designer 4.16.0 set. Let’s launch CubeIDE and go.
As the Workspace, choose the one you entered in TouchGFX Designer at the very beginning. Then import the project generated by TouchGFX Designer.
Now an important thing. When trying to run the Cube file do not update the HAL libraries! Click Continue. Do not click Migrate!
Why? We use HAL for STM32G0, because that’s what my Nucleo is. The project was written for HAL FW_G0 V1.3.0. The latest V1.4.1 has a horrible bug in the register definitions and you have to paste a few definitions into the headers…
It’s not worth bending over backwards 🙂 Let’s wait until they fix it.
After importing and launching Cube, we see a view like this.

On the left we see a few additional elements that you don’t have when creating a bare project in CubeMX.
First, we see folders like generated, gui, TouchGFX. These are things generated by TouchGFX Designer, as well as the TouchGFX library itself.
In these generated things there are headers informing where images and fonts are located, and also what our screens in the application look like.
Below there is one more cool folder with the mysterious name MB1642B. This is the code for the Shield with the display. This folder contains the display driver, SPI Flash memory, and joystick.
We’ll get to that later, but in short: for the TouchGFX engine you need to provide exactly such drivers. This engine has to know how to interact with the display and the Flash memory in order to work properly. In the future we’ll try to write such a driver ourselves.
Before we run the code, I have one more note. I always repeat that you should tick in Cube “Generate peripheral initialization as a pair of ‘.c/.h’ files per peripheral”. It allows you to keep better readability of the project.
For demo programs we do not tick it. Such splitting unfortunately breaks the example code written by ST. They refer to files that are created exactly in the way we get after generating in TouchGFX Designer, and it’s better not to touch it.
Problem with generating bitmaps
Unfortunately, I’m struggling with quite a big problem. If I create yet another project in TouchGFX Designer based on the online example — headers for images are not created.
It works nicely the first time, when I have a fresh installation. With each subsequent one — I get the following compilation error of the generated project.

No image definitions exist in the project. I reported the error to ST, but they can’t reproduce it. Let me know if you also have such problems.
Maybe it won’t happen with other projects…
Issue reported on the forum HERE
External Loader Flash SPI
If everything succeeded, you can build the project. You’d probably like to flash it to the microcontroller already, but no! It still won’t work.
TouchGFX uses external Flash memory where it stores all images. For the program to work correctly, those images have to be placed there.
But how do you do that? After all, it’s SPI memory connected to the microcontroller?
Here ST developed something some time ago called External Loader. While programming the microcontroller, we can also program the Flash memory connected via SPI.
It’s a great solution and I will definitely want to practice it on my own examples. The problem is that a single loader is dedicated to a single microcontroller and a specific hardware configuration.
It’s a small firmware that lets you transfer data coming from ST-Link to SPI Flash (or another memory).
You need to tell the script that loads our program that it must use the External Loader.
For our example it is located in the project folder <Project>\gcc and it is the file MX25L6433F_STM32G071B_NUCLEO.stldr
We need to copy it to CubeIDE plugins. For me it’s under the path <installed CubeIDE>\plugins\com.st.stm32cube.ide.mcu.externaltools.cubeprogrammer.win32_1.6.0.202101291314\tools\bin\ExternalLoader
Again, an inhuman path, right? 🙂
Paste this file into that location and return to CubeIDE. Launch the debug configuration.
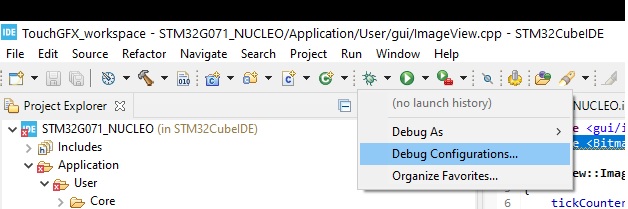
You now need to point to the file you copied. Go into the project debug configuration, then the Debugger tab, and at the very bottom you have the Misc. section.
Tick the checkbox next to External Loader (if it’s not already ticked). You should see some file that was assigned to the project. That loader is outdated and you need to choose the new one you copied.
Press Scan and select your file. In the screenshot below you have all those elements marked.
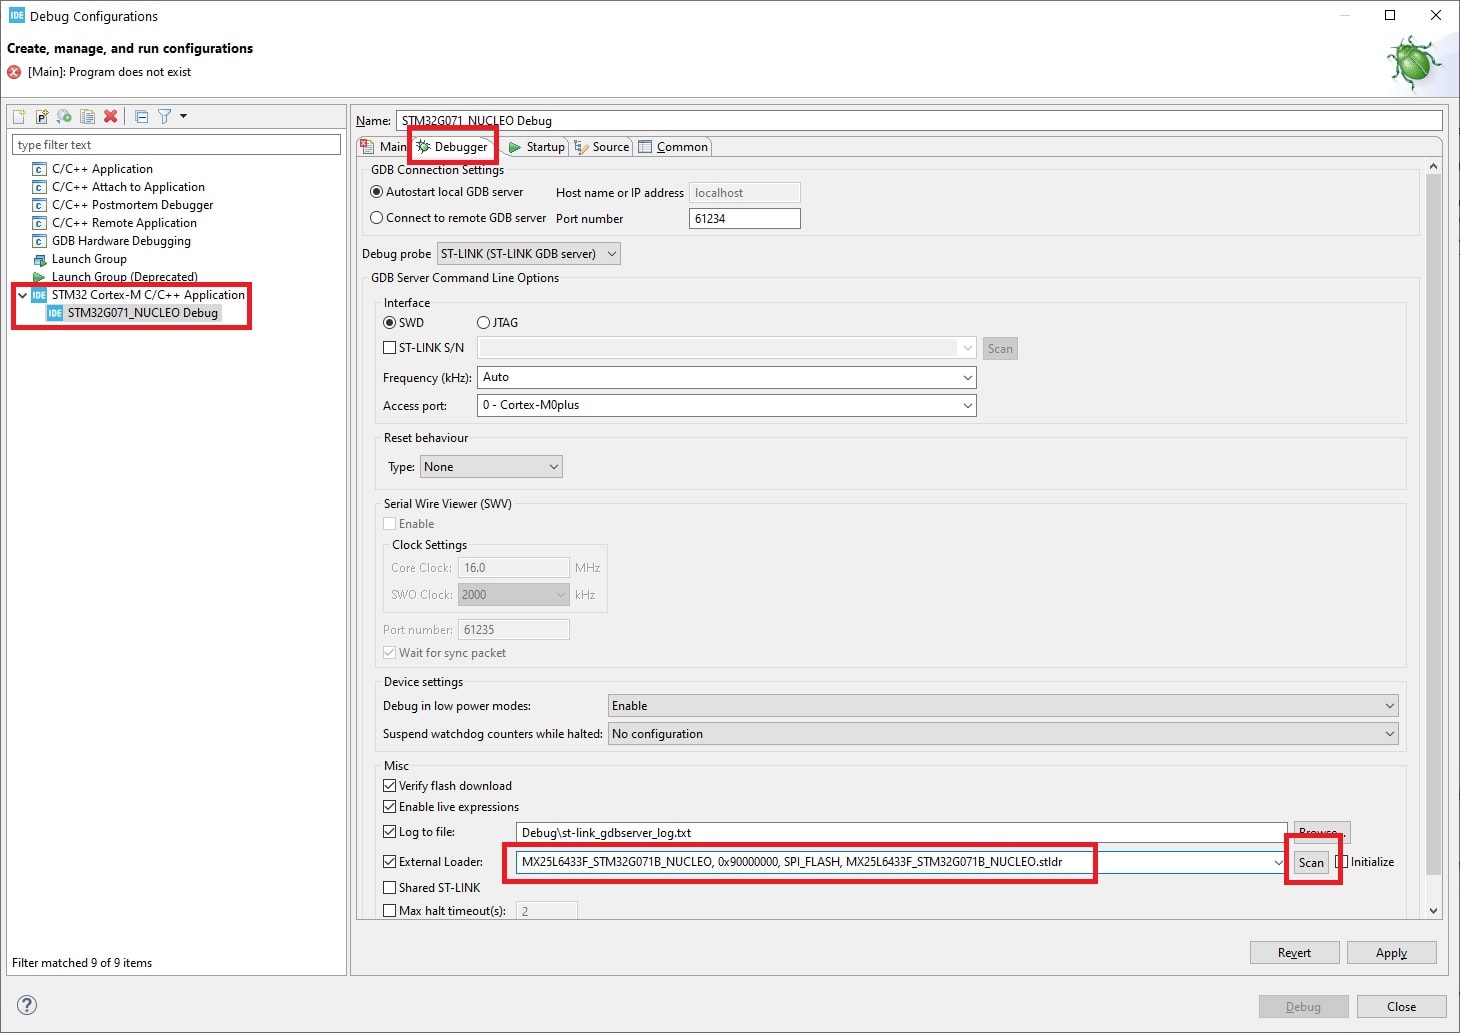
Save the configuration — via Apply — and run debug.
Demo in action
Now the program and the contents of the external SPI Flash should be programmed. You’ll see during flashing when the External Loader is executed. It’s quite distinctive.
The whole flashing process takes a bit longer due to the external Flash.
However, when everything succeeds, you can run the program. You’ll see a beautiful demo prepared for our Shield. I recorded a short video showing the program in action.
Admit it: for such a small microcontroller — STM32G071RB — the GUI runs great. This is TouchGFX. This engine is amazing and it looks like it will stay with me for longer!
Summary
As you can see, just running the demo program can already cause many problems. It doesn’t surprise me that so few people work with TouchGFX if it’s this complicated.
Unfortunately, I’m also worried about the small amount of materials about this environment. Especially ones that show how to implement your own hardware to work with TouchGFX.
It’s nice that there are demo programs, but we need to make our own. That’s what I’ll strive for and show you how I do it.
If you liked the article, buy something from me!  https://sklep.msalamon.pl/
If you noticed an error, disagree with something, would like to add something important, or simply feel like you’d like to discuss this topic, write a comment. Remember that the discussion should be polite and follow the rules of the Polish language.
Podobne artykuły





0 Comments