You’ve surely more than once on the Internet (and not only there) seen problems from people taking their first steps with microcontroller programming. One of such problems is that we can’t “do many things at once”. For example, wait for a measurement while at the same time blinking an LED and reading the state of a button. Frustration grows, and the “experts” laugh at such people in Facebook groups. What’s going on and how do you deal with it?
I can’t do many things at once…
Among people who are beginners in microcontroller programming, there is a false impression that everything we write should happen simultaneously. Let’s look at a PC. At the same time, the processor captures what’s on the keyboard, displays it on the screen, and in the background it’s still chatting with the Internet.
This “simultaneity” is not entirely true. Especially on microcontrollers. It’s only an illusion. Operations simply execute so fast that to a human it feels like doing “many things at once”.
On a PC it’s the same. The operating system, e.g., Windows, performs huge numbers of tasks in the background.
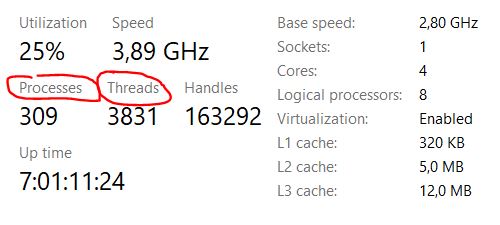
Only that’s a PC. It has many cores that take on these tasks. The OS cleverly switches the currently running task and we get the impression that everything is happening at once.
A microcontroller has one tiny core. It can perform only one operation at a time!
Our programs at the beginning don’t have such an operating system and nobody switches tasks for it. Besides, we won’t run Windows or Linux anyway. There are other systems for microcontrollers, and we’ll get to that in a moment.
Why do we get blocked?
We’re getting to the heart of the problem. Why can’t we manage to do many activities at once?
The answer is simple. We block the microcontroller’s work. How?
There is a function available in most frameworks in which we write software:
- For STM32 it will be HAL_Delay
- For AVR _delay_ms
- For Arduino delay
Its behavior ruins our whole elaborate plan of doing “many things at once” “simultaneously”.
Why? Well, this function orders our program to STOP and WAIT. To burn current, as I say 🙂
It is a function that BLOCKS the program’s work. Until the condition is met – the specified time elapses – this function does not allow other activities to be performed. Simply put, the processor’s task is to wait and be bored.
And that is a huge problem in writing software. Because it could be waiting, but at the same time doing other things and thus creating the impression of parallel task execution.
How to deal with Delay?
In short – you need to remove this Delay. Forget about it as soon as possible!
Well, maybe not entirely… I sometimes use it too, BUT not in the main loop of the program. Only during hardware initialization. Once the program is running, I avoid it like the plague.
Alright, but removing it will cause us to have no delays. How do you then wait for the next measurement or other cyclic activities?
There are several techniques for that, with which we actually replace Delay instead of just removing it.
1. Software timer / millis
A software timer is the simplest way to remove Delay. How does it work?
It relies on one hardware timer that counts – most often – the number of milliseconds since the program started. Regardless of what we do, this timer has an interrupt every 1 ms and the only thing it does is increment a global counter called the System Tick.
To read the passing time, we have special functions.
- In STM32: HAL_GetTick()
- In Arduino: millis()
- In AVR: There isn’t one. You have to implement it yourself on one of the hardware timers
By reading the current Tick value we know what time it is. Reading again, we know how much time has passed.
If we need to wait, for example, 500 milliseconds, then we “wait” until the Tick increases by that time. BUT we don’t wait in a blocking way!
- Store the current time.
- With each pass of the loop, check whether the specified time has already passed.
- If not – exit the condition and do something else. (Here is that “parallelism”)
- If yes – enter the condition and perform this cyclic action.
- Reload the variable with the current time to wait 500 ms again.
- Repeat in a loop.
There are several ways to check whether the specified time has elapsed. You can reload the remembered Tick. You can add a constant to the remembered Tick. You can reload/add before performing the action or after. How we write it depends on what we want to achieve.
2. State machine
This is an interesting way to drive the program flow or part of the program. It allows for truly convenient control of how the program should behave.
A state machine by itself will not eliminate blocking delays. You need to combine it with a software timer.
The point is that some object or piece of code can be in different states. The best example is a button. A plain microswitch.
We can distinguish 3 basic states for it:
- IDLE – nobody is doing anything, it simply stands and waits to be pressed.
- DEBOUNCE – a press has been detected, we must wait 20–50 ms to confirm the press.
- PRESSED – we waited, the button is still pressed – we confirm the press and perform the action.
We jump between states by doing different actions for each of them. We define transition conditions between them.
- IDLE waits for a press. If it happened – it jumps to DEBOUNCE.
- DEBOUNCE counts down 20–50 ms using the software timer. Once it counts down, it checks whether the press is still present. If yes – jumps to PRESSED. If not – returns to IDLE.
- PRESSED performs a one-time action. As long as we keep holding the button it does nothing. When we release – it returns to IDLE.
There can be more states. By adding more software timers we can detect:
- Long press
- Repeatable action every X milliseconds
- Button release action
There’s a lot to do here, and the state machine makes it easier. How does it work?
You enter the machine and look at the current state. If there’s something to do – you do it. If not – you exit the machine and do something else. You come back on the next loop pass.
Simple? Sure 🙂 Again, we didn’t use Delay, and we already have something really substantial.
3. RTOS – Real-Time Operating System
This is already heavy artillery, but it is also the most effective. Eventually projects will start to get complicated. Then a software timer and a state machine won’t be enough to properly control the distribution of CPU time among individual tasks.
An RTOS helps, i.e. a real-time operating system (Real Time Operating System). These are small systems – not like Windows or Linux – that provide us with the functions needed to build a multitasking system.
However, I’d like to warn beginners a bit. You’ll often hear advice to just take an RTOS and it will be fine. Unfortunately, it won’t.
RTOSes are compiled tools. You can’t just turn them on so that they work well. You have to write the application with the system in mind.
All tasks in such a system are like separate programs. The system itself allocates CPU time to individual tasks according to priorities and whether they are ready to run. Between tasks we communicate in a special way using what such a system offers: queues, semaphores, mutexes, signals.
When writing with an RTOS we must change the way we think about creating software.
My advice is: try the simple things from points 1 and 2 first. Only after you get comfortable with programming should you try RTOSes.
What’s available? A few examples are FreeRTOS, mbed OS, Azure RTOS, Keil RTX, ThreadX, Zephyr.
Where to learn this?
I personally teach all of this in the STM32 Course for Beginners (the course is conducted in Polish).
We start with software timers and the state machine. We build simple things and learn to use these programming techniques.
After learning additional peripherals we move on to learning FreeRTOS and building a real application running under this system.
The course contains about 50 hours of STM32 programming material. In addition to learning the microcontroller peripherals themselves, I share tons of good practices and useful tricks. A total of 12 modules of huge knowledge.
Registration is currently open for the next – already the fourth – edition. So far, OVER 550 people have joined!
Don’t miss the opportunity! Registration is open only until Friday, 25/02/2022 at 22:00.
All details together with the COURSE AGENDA and DEMO LESSONS can be found at https://kursstm32.pl

Podobne artykuły





0 Comments