If you asked men about this in general, probably each of them would say yes. The problem is that while answering, they’re probably not thinking about microcontrollers… So let’s consider our microcontrollers. Is it good to have two cores, or rather – two CPU cores?
This article was created based on my LIVE #1, and it is also a supplement to it.
Dual-core processors
We’ve known multi-core CPUs in computers for a long time now. I remember when Intel’s Dual-Core processors were coming out. When you were buying a new computer back then, the salesperson in the store would sprinkle magic dust as if it were some unknown NASA technology. What, two processors in one?! Exactly 2 times faster than before?! It was hard to believe.
Today, hardly anyone even bats an eye when AMD releases a processor with 32 cores. It’s basically the norm for us.
It’s a bit different in the world of microcontrollers. Here, that WOW I had when I was much younger is only just beginning. Maybe it’s not as huge a WOW anymore, but I’m still impressed.
Technological progress in embedded
When writing applications for computers, we’ve already gotten used to the fact that they have “unlimited” resources. It’s different on microcontrollers. Until now we had one core and we had to write programs so that they sensibly juggled resources and tasks.
In recent years, the embedded industry has definitely moved beyond blinking an LED or acquiring sensor data and has gone in a more complex direction. Displays appeared at first. First simple, monochrome graphical ones. Then the first color ones, mostly in phones. I remember a Siemens S65 advertisement that shouted that its display had AS MUCH AS 13 cm² of area! Today we’d snort with laughter, but back then it was quite an achievement for small microcontrollers.
Now, trained by smartphones, we want to build our tiny microcontroller devices with displays of huge resolution as well. It quickly turns out that our creations don’t run as smoothly as we’d like.
All because drawing on such screens takes a crazy amount of time and resources. Even low-resolution displays, but driven over SPI, draw the whole screen for “an eternity”. And after all, we still need to keep using sensors somewhere around that. It’s even worse when we have to control motors in real time.
STM32H7
One interesting solution is to separate “multimedia” tasks from “control” tasks. And I think that’s exactly what the dual-core STM32 H7 series was created for. The main core is a Cortex-M7, which has tons of multimedia features. The second is the well-known Cortex-M4.
Both cores are enclosed in a single package. Peripherals are single, but all cores have access to them. So you can decide who does what.
Some time ago on my first LIVE I showed how to get started with a Nucleo board with the STM32H745.
You can buy such a board from me in my store.
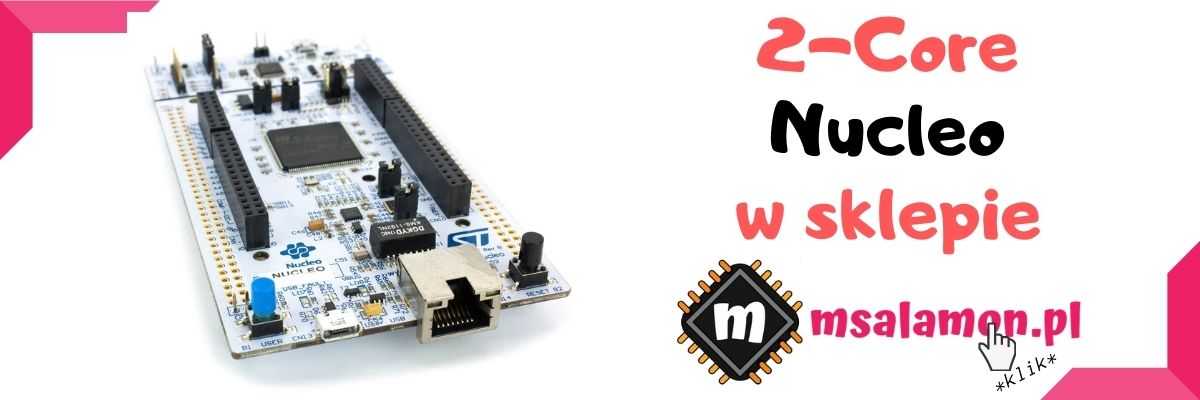
What exactly does such a microcontroller have? I don’t want to go on and on, because you can see it in the store, but the most important info includes:
- 480 MHz (M7) and 240 MHz (M4)
- 2 MB Flash, 1 MB SRAM
- Ethernet
- DCMI
- FMC
- SDIO
- Quad SPI
- DAC
- TFT controller, graphics accelerators, hardware JPEG
There’s of course much more, but I listed only the more interesting things.
On the Nucleo board we of course get a programmer. Here it’s the ST-Link V3, so the newest design. It allows working with two cores. How to configure a project and run your first program?
Creating a project, peripheral configuration
Writing firmware for such a dual-core microcontroller is quite specific. In fact you have to write two “independent” programs. Each has its own startup code, its own interrupt vector, and therefore its own NVIC. Such a project will consist of two subprojects. How to handle it? Well fortunately we have STM32CubeMX! It will do for us practically most of what we need.
In Cube, when creating a new project, it’s enough to select our microcontroller, or even better select by board if you’re using Nucleo. After creating the project, we’ll of course see the microcontroller view and the peripheral tree.

The view is quite familiar, however when you open the tree on the left side you’ll see there are some differences compared to single-core microcontrollers.
First of all, you’ll see two NVICs. One for each core.
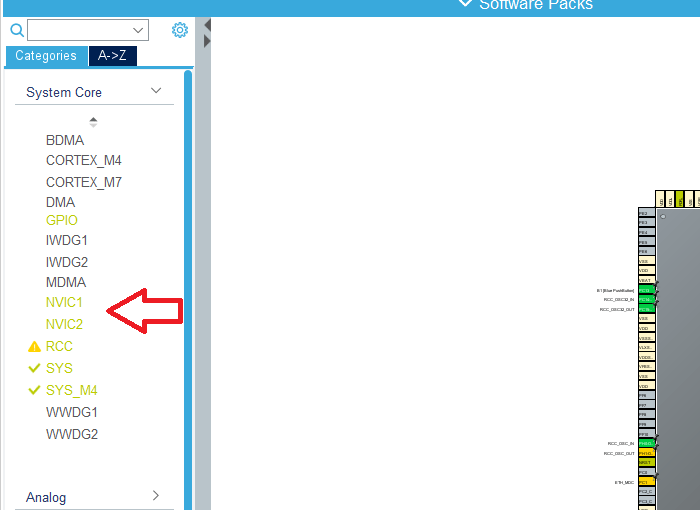
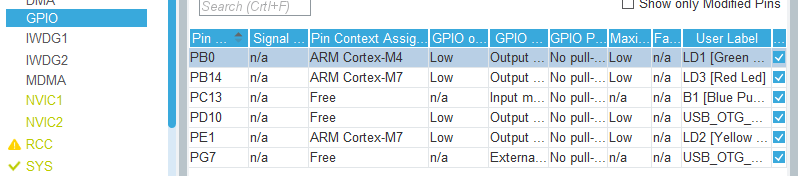
Another interesting thing when using Cube for dual-core MCUs is that in peripheral settings there is a split into Cortex-M7 and Cortex-M4. This split looks different depending on the peripheral. Let’s take GPIO first.
Each pin we select can be assigned to one of the cores or left “Free”. Unfortunately, from what I tested, we cannot assign one GPIO pin for use by two cores. Leaving a pin as “Free” only reserves it in Cube, but later it won’t be in the code for either core. Not even initialization.
This is what assigning the individual LEDs from Nucleo to cores looks like.
Let’s also look at an example with I²C. Entering the I2C1 settings, the first thing we see is a small table.
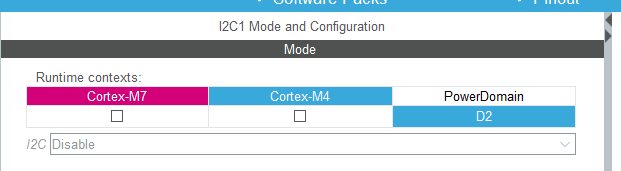
Let’s demystify it! I’ll start with PowerDomain. This is information about which power domain of the whole MCU this interface is in. A useful thing if we want to optimize energy.
In Runtime contexts we choose which core will be able to use I2C1. Here it’s a bit different than with GPIO because we can select that both M7 and M4 can communicate through this interface. If we select both, something new appears!
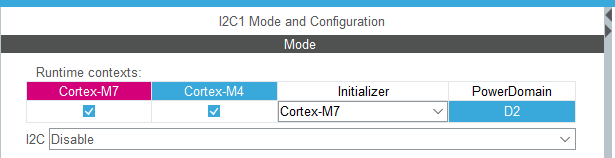
The Initializer selection appeared. We choose which core is responsible for the entire initialization of this interface. Important information here: who initializes, later handles the interrupts. So by choosing M7 as the initializer, interrupts will come to NVIC1.
The rest of the I²C settings are basically the same as in the single-core case.
Now a useful tip 🙂 Jf you want to quickly determine which core will use which interface, who initializes, and which voltage domain it’s in, there are two nice toggles under the gear icon. It’s worth checking them. Then we’ll see this beautiful view next to the interface tree.
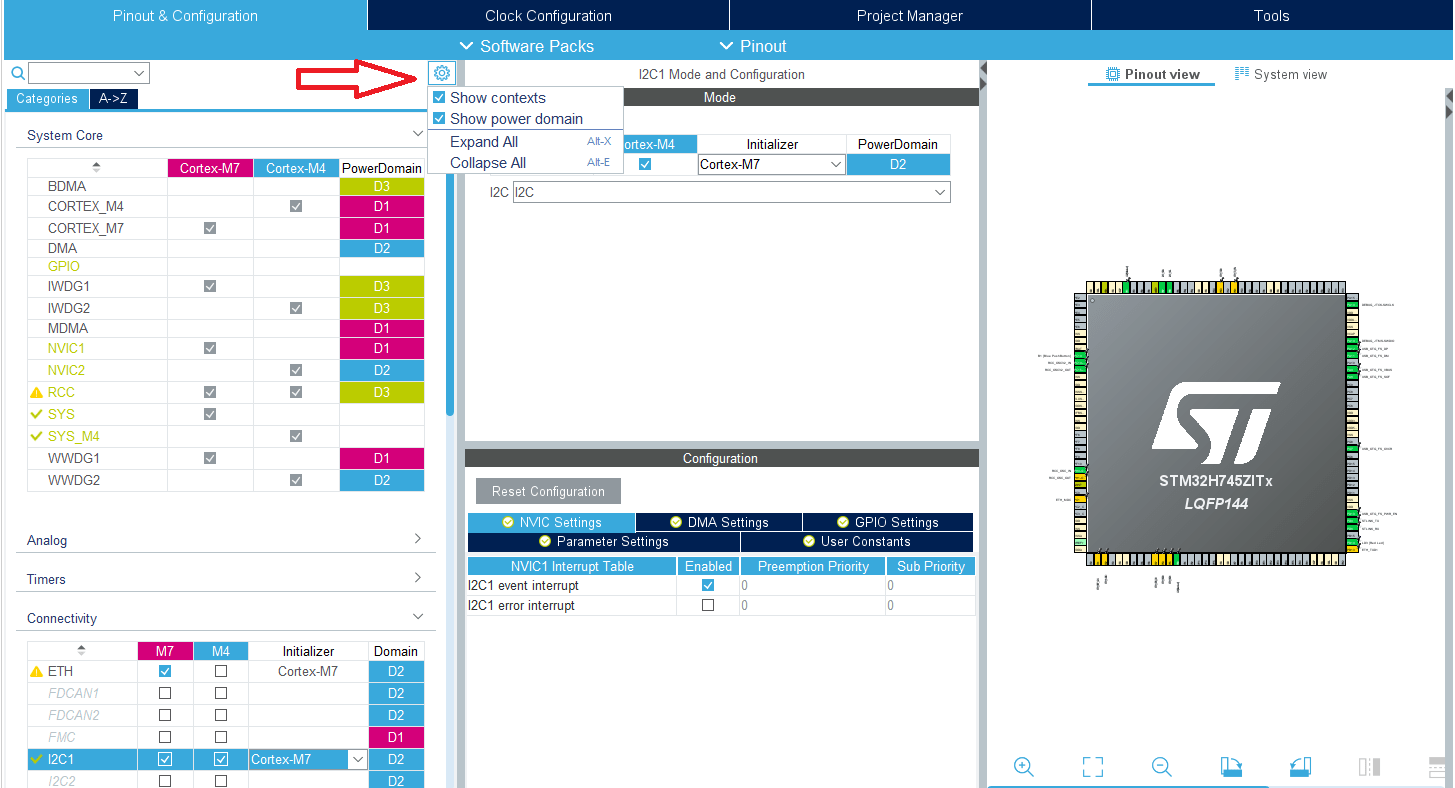
You can quickly click through the cores, the initializer, and match the interfaces to the appropriate domains if needed. Lovely!
Clocks
The bane of every beginner STM32 programmer is setting up clocks. Of course Cube makes it easier, and how! A beast like STM32H745 intuitively should have even more settings than a regular single-core one. Let’s see.

There’s quite a lot! However I expected there would be more 🙂 I marked the most important clocks, i.e. the clocking of our M7 and M4 cores. As you can see, our cores’ clocks are tied together. Thanks to this, the clock tree isn’t as messy.
Below the main clock there are tons of multiplexers to choose the clocks for peripherals. We’ll worry about that only when we want to use one of them.
Code generation
What does code for a dual-core MCU look like? For a “normal” microcontroller we generate and we have the whole project nicely divided into Inc, Src, Drivers, other things, and of course main.c where everything happens.
After generating such a project for the H745 we de facto have two projects connected into one larger one. This happens because in fact when writing for 2 cores we write two separate programs! They end up in a different place in Flash memory.
Such a combined project looks like this.
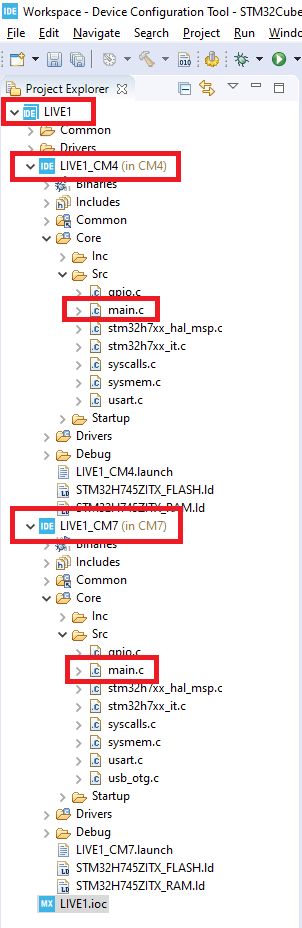
What do we see here? We have one large hierarchical project named LIVE1. It aggregates two other projects. One LIVE1_CM4, which is dedicated to the M4 core, and analogously for the M7 core there is LIVE1_CM7.
Each project has its own main.c and its own set of libraries. They are built separately. Nothing from one project leaks into the other.
That’s why, for example, if you selected GPIO for one core, you won’t have the pin definition in the other.
At first it can be hard to navigate such a project due to identical file names. My suggestion is to split the IDE editor window into two and keep files for only one core on each side.
By default, Flash memory in the microcontroller is divided in half for the two cores. 1024K is reserved for each.
RAM is different. For M7 there is 128K RAM and 64K ITCRAM. M4 has as much as 288K of RAM.
During the LIVE there was a question about whether you can change these sizes. Of course you can change them. Where? In the linker files! In each project there are files with the *.ld extension.
In them, you can shift, for example, the programs in Flash memory, and I tested it live. Thanks to this, we don’t have to worry that we’ll “waste” a large part of Flash on less extensive code for one of the cores. Simple and effective.
Summary
True, I still haven’t answered the question from the title of the post bluntly, but you can already feel under the surface that two cores can be better. Certainly in terms of performance, because the difficulty of writing code for such little creatures increases a lot. Two projects at once can really give you a hard time!
In the next post I’ll blink LEDs and show you what a mini rollercoaster it is to flash such a program to the microcontroller and debug it! If you can’t wait for blinking LEDs on two cores, I did it on the LIVE, so I also invite you to the recording (the content is in Polish).
If you liked the article, buy something from me!  https://sklep.msalamon.pl/
If you noticed any mistake, you disagree with something, you’d like to add something important, or you simply feel like you’d like to discuss this topic, write a comment. Remember that the discussion should be polite and consistent with the rules of the Polish language.
Podobne artykuły







0 Comments