Recently I wrote about how to drive WS2812B LEDs with STM32. However, control alone is not enough to fully enjoy the possibilities offered by entire strips of these LEDs. Today I will present a library containing a range of interesting lighting effects. Let’s get to work!
This article is part of the series:

Arduino libraries and STM32
There is one thing I like about Arduino. It’s the abundance of ready-made libraries written for this platform. Sometimes they’re written better, sometimes worse, but for the general idea of how to approach problems, I think they’re good. It’s no different with addressable LEDs and lighting effects for them. There is a neat WS2812FX library on GitHub written by user kitesurfer1404 (link), which contains lots of interesting animations for our LEDs. Unfortunately, it’s written in Arduino C++, so I decided to port a significant portion of it for STM32 and my HAL-based WS2812B library.
HSV color space model
The WS2812FX library is entirely based on the RGB color space, where you provide the values of the red, green, and blue components. A very interesting alternative to RGB is the HSV space. It corresponds to how our eye perceives colors. The components of this model are:
- H (hue) – the shade of light, i.e., the color. Takes values in degrees on the color wheel from 0 to 359.
- S (saturation) – color saturation. How much color is in the emitted light.
- V (value, brightness) – the intensity of white light.
By default, S and V are fractions and lie in the range between 0 and 1. For microcontroller needs, I wrote conversion functions both ways (RGB->HSV and HSV->RGB) using the 0 – 255 range for these components and, of course, 0-359 for the H component. It’s a shame to waste clock cycles on floats when there can really be a lot of these operations 😉 After all, not every MCU has an FPU.
The HSV model looks as follows graphically.
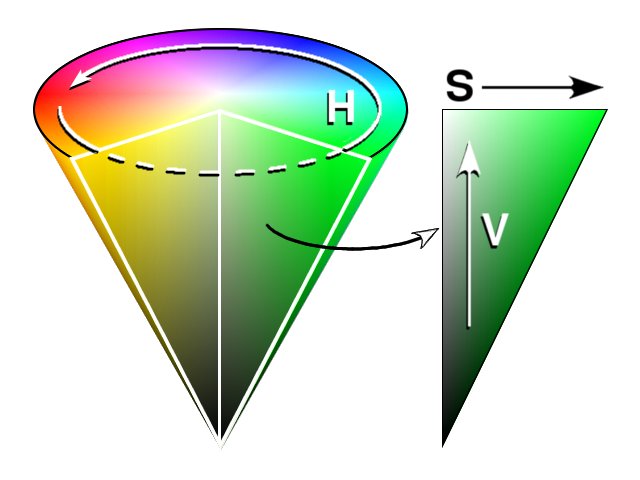
The figure helps visualize how modifying individual components affects the resulting color. H is, of course, the base color. Turning the S component smoothly transitions the color toward white light. Turning V dims the color toward black. You can get interesting transition or pulsing effects from this.
I added these two effects myself while porting the library. They are, respectively, a transition from white or black toward the user-set color. The duration of the entire transition (expressed in milliseconds) color->white->color is defined via the speed-setting function. I’m mentioning this because for the remaining effects the speed value is interpreted differently and defines the time between successive steps in the effect (also in milliseconds).
How the library works
The ported library operates on a software timer, which is decremented in the SysTick timer interrupt. When the timer reaches zero, the WS2812BFX_Callback() function calls the previously selected effects mode. There, the next step is performed to update the values of the LEDs in the strip and to set the software timer, the previously defined time until the next step. A simple example looks like this:
WS2812B_Init(&hspi1);
WS2812BFX_SetSpeed(5000);
WS2812BFX_SetColorRGB(0, 0,255,0);
WS2812BFX_SetColorRGB(1, 32,0,0);
WS2812BFX_SetColorRGB(2, 0,64,0);
WS2812BFX_SetMode(FX_MODE_WHITE_TO_COLOR);
WS2812BFX_Start();

/* USER CODE END 2 */

/* Infinite loop */
/* USER CODE BEGIN WHILE */
while (1)
{
/* USER CODE END WHILE */

/* USER CODE BEGIN 3 */
	WS2812BFX_Callback();
}
The first step is to initialize LED control with WS2812B_Init(&hspi1). Just like in the previous post, I used SPI1 here. Next, you need to configure the strip’s behavior.
You need to set the speed using a function. You can also do this while the effect is running.
WS2812BFX_SetSpeed(uint16_t Speed)
As I mentioned earlier, for all modes the Speed value defines the time between successive steps in milliseconds. Two modes – FX_MODE_WHITE_TO_COLOR and FX_MODE_BLACK_TO_COLOR – are exceptions, and this value defines the duration of a full transition cycle.
Next, set the colors that will be used in the mode using one of the dedicated functions.
void WS2812BFX_SetColorStruct(uint8_t id, ws2812b_color c);
void WS2812BFX_SetColorRGB(uint8_t id, uint8_t r, uint8_t g, uint8_t b);
void WS2812BFX_SetColorHSV(uint8_t id, uint16_t h, uint8_t s, uint8_t v);
void WS2812BFX_SetColor(uint8_t id, uint32_t c);
Some modes use 2 or even 3 colors. The color number is specified by the id argument. I prepared 4 functions for convenience. You can set a color using the RGB or HSV space. Setting via a structure or a 32-bit variable sets the color in RGB in the given formatting.
The next step is to choose the effect.
void WS2812BFX_SetMode(fx_mode mode);
As an argument, the function takes an enumeration value with the name of the selected function.
typedef enum {
	FX_MODE_STATIC,
	FX_MODE_WHITE_TO_COLOR,
	FX_MODE_BLACK_TO_COLOR,
	FX_MODE_BLINK,
	FX_MODE_BLINK_RAINBOW,
	FX_MODE_STROBE,
	FX_MODE_STROBE_RAINBOW,
	FX_MODE_BREATH,
	FX_MODE_COLOR_WIPE,
	FX_MODE_COLOR_WIPE_INV,
	FX_MODE_COLOR_WIPE_REV,
	FX_MODE_COLOR_WIPE_REV_INV,
	FX_MODE_COLOR_WIPE_RANDOM,
	FX_MODE_COLOR_SWEEP_RANDOM,
	FX_MODE_RANDOM_COLOR,
	FX_MODE_SINGLE_DYNAMIC,
	FX_MODE_MULTI_DYNAMIC,
	FX_MODE_RAINBOW,
	FX_MODE_RAINBOW_CYCLE,
	FX_MODE_FADE,
	FX_MODE_SCAN,
	FX_MODE_DUAL_SCAN,
	FX_MODE_THEATER_CHASE,
	FX_MODE_THEATER_CHASE_RAINBOW,
	FX_MODE_RUNNING_LIGHTS,
	FX_MODE_TWINKLE,
	FX_MODE_TWINKLE_RANDOM,
	FX_MODE_TWINKLE_FADE,
	FX_MODE_TWINKLE_FADE_RANDOM,
	FX_MODE_SPARKLE,
	FX_MODE_FLASH_SPARKLE,
	FX_MODE_HYPER_SPARKLE,
	FX_MODE_MULTI_STROBE,
	FX_MODE_CHASE_WHITE,
	FX_MODE_CHASE_COLOR,
	FX_MODE_CHASE_RANDOM,
	FX_MODE_CHASE_RAINBOW,
	FX_MODE_CHASE_FLASH,
	FX_MODE_CHASE_FLASH_RANDOM,
	FX_MODE_CHASE_RAINBOW_WHITE,
	FX_MODE_CHASE_BLACKOUT,
	FX_MODE_CHASE_BLACKOUT_RAINBOW,
	FX_MODE_RUNNING_COLOR,
	FX_MODE_RUNNING_RED_BLUE,
	FX_MODE_RUNNING_RANDOM,
	FX_MODE_LARSON_SCANNER,
	FX_MODE_COMET,
	FX_MODE_FIREWORKS,
	FX_MODE_FIREWORKS_RANDOM,
	FX_MODE_MERRY_CHRISTMAS,
	FX_MODE_FIRE_FLICKER,
	FX_MODE_FIRE_FLICKER_SOFT,
	FX_MODE_FIRE_FLICKER_INTENSE,
	FX_MODE_CIRCUS_COMBUSTUS,
	FX_MODE_HALLOWEEN,
	FX_MODE_BICOLOR_CHASE,
	FX_MODE_TRICOLOR_CHASE,
	FX_MODE_ICU
} fx_mode;
At this point, the previously selected colors are assigned to the mode variables, and all the counter variables used in the library are reset. The library is now ready to start. To launch the effects, simply call
void WS2812BFX_Start(void);
Place the callback to handle effects in the main loop.
void WS2812BFX_Callback(void);
To make the software timer work together with SysTick, you need to define the callback function.
/* USER CODE BEGIN 4 */
void HAL_SYSTICK_Callback(void)
{
  WS2812BFX_SysTickCallback();
}
/* USER CODE END 4 */
As you can see, I placed it in section four for user code in the main.c file. This way, SysTick can handle more than just this. Note that void HAL_SYSTICK_Callback(void) is a weak function, just like the DMA callbacks used in the previous post. Without defining this function, the FX library will not work!
That’s it. You can admire the selected effect. I recommend testing it out.
Summary
By complementing the WS2812B code with a library of lighting effects, I’m sure it will be used by many people during the upcoming holidays. Admit it, the effects are great!
I continue to support the ported library, so if you find any bugs, let me know. In the original Arduino code, a split into independent segments was also implemented. I will take care of this soon and publish a relevant post.
Thank you for reading this post. If you like this kind of topic, let me know in a comment. I would also appreciate suggestions for topics you would like me to cover.
The code is, as usual, available on my GitHub: link
If you noticed any error, disagree with something, would like to add something important, or simply feel like discussing this topic, write a comment. Remember that the discussion should be polite and in accordance with the rules of the Polish language.
This article is part of the series:
Podobne artykuły







0 Comments